Google Play IAP: Grant Gold Tokens
This guide connects a consumable Google Play product to a server-side TurnKit Player Store transaction. Example product grants 520 gold tokens after Play confirms a completed purchase.
Define the Gold Token Store Key
In Unity, open Tools → TurnKit → Configuration and create a Player Store definition with key gold_token. Use type NUMBER, disable client writes, enable client reads, and leave the cooldown empty. This keeps balances visible to the game client while preventing clients from editing them.
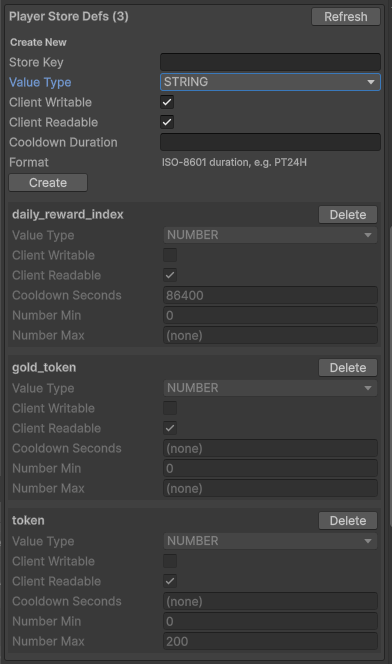
Create the Grant Transaction
In Player Store Tx Catalog, create an enabled transaction named grant_gold_token_520. Add one mutation: gold_token → ADD → 520.
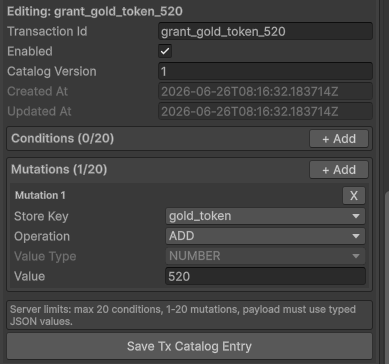
For transaction behavior and client usage, see Player Store.
Create and Activate a Play Product
- In Play Console, open the app whose package matches the Android package configured in TurnKit.
- Open Monetize with Play → Products → One-time products (some consoles may still label these in-app products), then create a product with ID
gold_token_520. - Add product details, configure regional pricing, and create at least one purchase option.
- Save and activate the product and purchase option.
Product IDs are case-sensitive and must match the TurnKit purchase mapping. The purchase option ID belongs to the Play Billing offer flow; TurnKit mapping uses the product ID. See Google's one-time product guide and Billing integration guide.
Set Up Play Verification Credentials
TurnKit verifies purchases through Google Play Developer API. In Google Cloud, create or select a project, enable the Google Play Developer API, and create a service account. In Play Console, invite its email address and grant the permissions needed for Play Billing API access. Download a JSON key for the service account and keep it private.
Follow Google's current Google Play Developer API setup. Google lists View financial data, orders, and cancellation survey responses and Manage orders and subscriptions for Play Billing API access.
Save Credentials and Add the Purchase Mapping
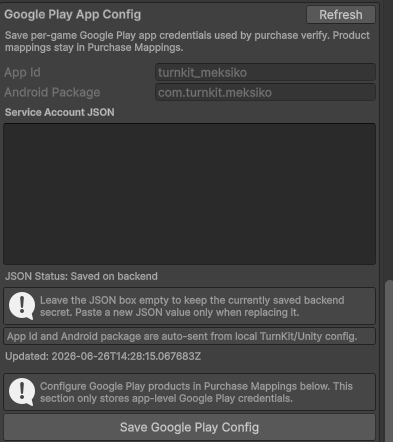
In TurnKit Configuration, check the read-only App Id and Android Package. Paste the full service-account JSON into Google Play App Config and save. The app ID and package are supplied by local TurnKit/Unity config.
Under Purchase Mappings, add an active mapping with provider GOOGLE_PLAY, purchase type PRODUCT, product ID gold_token_520, and grant transaction ID grant_gold_token_520.
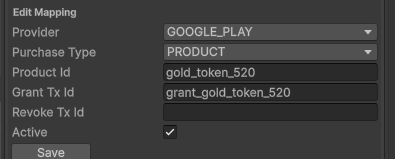
Verify Purchases from Unity
Integrate Google Play Billing in the app and call TurnKit only after Play reports the purchase state as PURCHASED. Pending purchases must not grant currency. The example uses the active player session; use the explicit TurnKitPlayerSession overload when your flow is outside that context.
var result = await PlayerStore.GooglePlayPurchase(
    "com.example.game", // exact Play Console package name
    "gold_token_520",
    purchaseToken,
    StorePurchaseType.PRODUCT
).Verify();

if (!result.Succeeded)
{
    // Show verification failure. Never grant currency locally.
    return;
}

// TurnKit applies the grant_gold_token_520 mapping after verification.ProcessPurchase listener, return PurchaseProcessingResult.Pending and call ConfirmPendingPurchase(product) only after verification succeeds and TurnKit reports the grant applied or already applied. With Unity IAP 5's StoreController flow, confirm the PendingOrderafter the same server result. If verification fails, leave the order pending so the app can retry. Do not return Complete before the server response. Unity's purchase processing guide documents the pending flow. Google recommends server-side consumption for added reliability, while client-side confirmation after the server grant is also supported.Test the Purchase
Add a license tester and use an internal test track on an Android device. The installed app package must match Play Console. Test both successful verification and pending purchases. Read Google's Play Billing test guide before release.